In a nutshell
- 🧊 Use ice cubes to create controlled steam that delays crust set, boosts oven spring, and yields a glossy, blistered, crisp crust through starch gelatinisation and Maillard browning.
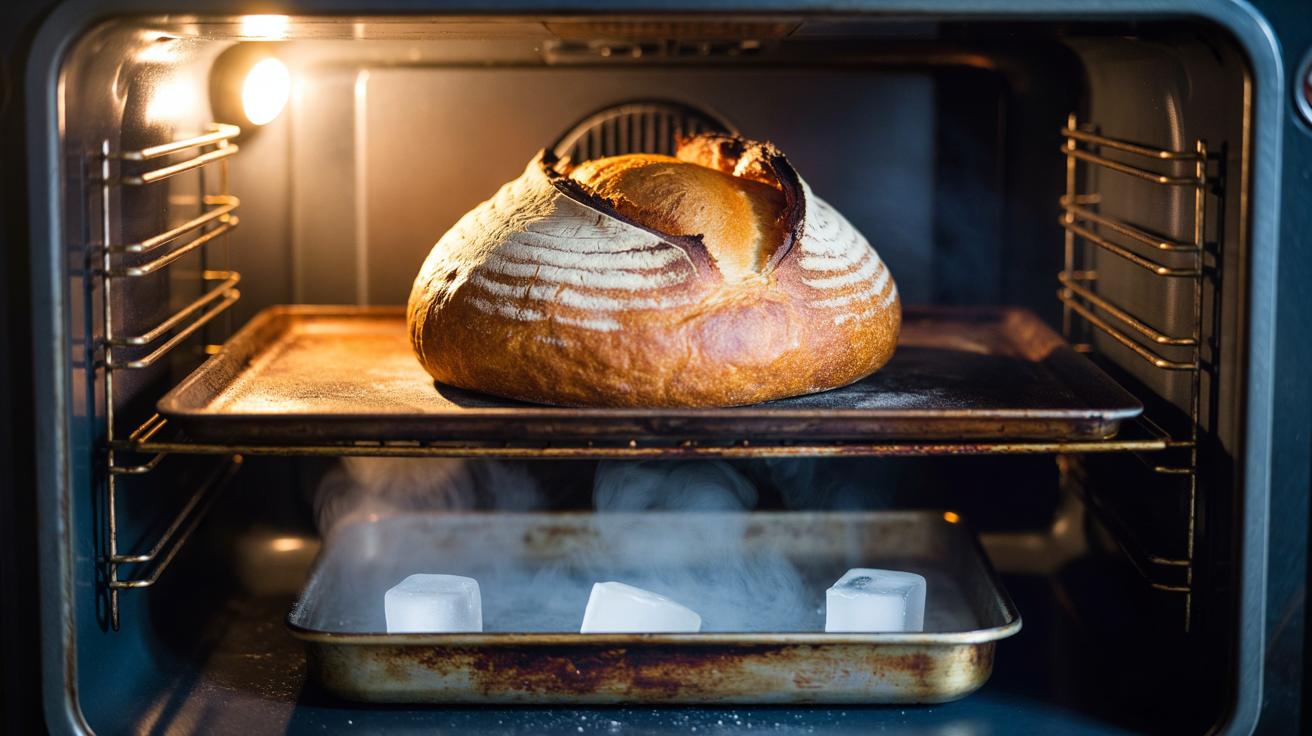
- 🔧 Method: preheat to 240–250°C, load loaf, add 60–120 g ice to a hot lower tray for 15–20 minutes of steam, then vent and finish at 220–230°C to about 96°C internal for a shattering finish.
- 🍞 Equipment options: Dutch oven (no ice, covered first 20 min), tray + ice for flexibility, lava rocks to extend steam, or a metal bowl tent for leaky ovens; pair with a baking steel for fierce bottom heat.
- 🧪 Troubleshooting: pale crust—raise temp or bake longer; leathery skin—reduce ice or vent sooner; side blowouts—improve proofing and scoring; sooty base—shift the baking surface up a rack.
- 🛡️ Safety first: use a deep metal tray, never glass; avoid pouring water on the oven floor or door; wear dry gloves, keep cubes small, and disable the fan or shield the loaf to prevent steam loss.
Home bakers chase that bakery crackle: a blistered, burnished crust that sings as it cools. The simplest upgrade is almost comically humble. Add ice cubes to a preheated tray and let controlled steam do the heavy lifting. The cubes melt, then flash into vapour, saturating the oven just long enough to lift the dough, set a glossy sheen, and delay crust hardening. It’s neat, cheap, and effective. Handled carefully, this trick transforms decent loaves into showstoppers without specialist kit. Below, you’ll find the science, the exact method, equipment options, and smart fixes. Use it with a white tin, a seeded bâtard, even a high-hydration sourdough. The payoff is real.
Why Steam Matters for Crust Development
Great bread is a timing act between heat, moisture, and sugar. Early in the bake, steam condenses on the dough’s cool surface, keeping it supple while the interior expands. That delay in crust formation gives you dramatic oven spring and fine ear development along the score. As the surface starches reach gelatinisation temperature, they form a thin film that later dries to a shattering, glassy crust. Get this phase right and you’ll see sheen, blisters, and bold lift. Dry heat from the start, by contrast, locks the skin too soon. The loaf tears, the crumb tightens, flavour suffers.
Ice cubes help because they release moisture gradually. One cube buys you seconds; a handful buys you minutes. That’s all you need. In a domestic oven set to 230–250°C, a burst of humidity for 10–20 minutes promotes colour through Maillard reaction while preventing premature toughening. Think about it as humidity management. Water poured onto a cold tray puddles and sputters. Ice lands, melts, and flashes neatly. A small, predictable pulse of steam beats chaos every time. Result: a crisp crust with that sought-after brittle snap and a crumb that stays tender.
Ice Cubes in Practice: Step-by-Step Method
Preheat your oven to 240–250°C with a heavy tray on the lowest shelf and your baking surface—stone, baking steel, or another tray—on the middle shelf. Give it 40–60 minutes for full saturation. Prepare 60–120 g of ice (roughly 4–8 standard cubes) in a heatproof bowl. Load your shaped and scored loaf onto the hot surface. Immediately tip the ice onto the bottom tray, shut the door fast, and let the chamber flood with steam. Speed matters: every second the door is open bleeds heat and humidity. Bake with steam for 15–20 minutes, then open the door briefly to vent.
For the finish, drop the temperature to 220–230°C and continue until the crust is deep chestnut and the internal temperature hits roughly 96°C. For a thinner yet shatteringly crisp crust, crack the door with a wooden spoon for the final 5 minutes to drive off lingering moisture. Typical ice amounts per loaf: 60–90 g for a 500 g dough; up to 120 g for a large bâtard. If the crust is leathery, you used too much. If it’s dull and pale, you likely used too little—or ended steam too soon. Fine-tuning the ice mass tunes the crust.
Equipment Setups: Dutch Oven, Tray, and Steam Hack
The Dutch oven remains the gold standard for home loaves. Its sealed chamber traps the dough’s own moisture, so ice isn’t necessary. Bake covered for 20 minutes, then uncover to brown. The limitation? Shape and batch size. For free-form loaves without a pot, the ice-on-tray method excels. Use a thick, preheated metal tray or an enamelled roasting tin on the bottom shelf; never glass. Direct water on glass or the oven door risks thermal shock. A baking steel above gives you fierce bottom heat and faster spring.
To extend steam, some bakers preheat a tray filled with clean nuts-and-bolts or lava rocks, then drop ice onto the hot mass. The extra surface area turbocharges evaporation without dangerous splatter. If your oven leaks badly, tent the loaf with an inverted metal bowl for the first 15 minutes and still add two cubes to the tray below. That hybrid approach is forgiving and powerful. For fan-assisted ovens, consider switching the fan off, if possible, during the steam phase to avoid blowing moisture away. When in doubt, start small and scale ice by results, not rules.
| Setup | Ice (per 500 g loaf) | Steam Duration | Pros/Notes |
|---|---|---|---|
| Dutch oven (covered) | None | 20 minutes (covered) | Superb spring; shape-limited; no extra kit |
| Tray + ice cubes | 60–90 g (4–6 cubes) | 15–20 minutes | Flexible, cheap; monitor for over-steaming |
| Lava rocks + ice | 60–120 g | 20+ minutes | More consistent vapour; requires preheated mass |
| Metal bowl tent + two cubes | 30–40 g | 12–15 minutes | Great in leaky ovens; easy cleanup |
Troubleshooting and Safety: Common Mistakes and Fixes
Pale crust? Increase either the bake time after venting or the initial oven temperature, and check that the steam phase lasted at least 12 minutes. Leathery skin or wrinkling as it cools signals excess moisture; reduce ice or vent sooner. Blown-out sides mean the crust set unevenly, often due to under-proofing or timid scoring; proof to the poke test and cut deeper at a confident angle. A sooty base hints at a tray too close to the element; move the baking surface up one rack. Small adjustments compound into dramatic improvements.
Safety matters. Use a deep, heavy metal tray for the ice; never pour water onto the oven floor, heating element, or glass door. Metal only—no Pyrex, no ceramic—for the steam tray. Wear dry oven gloves and stand back to avoid the initial plume. Keep cubes small; giant blocks can spit. For fan ovens that cannot disable convection, use slightly more ice and shield the loaf with a metal bowl for the first 10 minutes. Finally, judge doneness by colour, aroma, and sound—hollow tap on the base—because crust quality isn’t just crunch, it’s flavour locked in by balanced steam.
Used thoughtfully, ice cubes provide a reliable, repeatable route to bakery-grade crust: shining, brittle, and richly aromatic. The method slots into any schedule, scales to different loaves, and asks only for a tray and a handful of frozen water. Tinker with cube count, rack positions, and vent timing, and you’ll quickly map your oven’s personality. The thrill is hearing your bread crackle as it cools. Ready to test it on your next bake—what loaf will you try first, and how will you tweak the steam to suit your kitchen?
Did you like it?4.3/5 (24)