In a nutshell
- 🧊 The science: steam from melting ice reverses starch retrogradation, re-gelatinising the crumb and reviving a crisp crust without sogginess.
- ⏱️ The 5-minute method: Steam first, then dry—Oven 180°C (160°C fan) with ice in a ramekin, Air fryer 160°C, Microwave 600W plus toaster for snap.
- 🔍 Use vs bin: Rescue stale bread only; bin spoiled or mouldy loaves. Works for baguettes, sourdough, brioche; lower heat for gluten-free; add 2–3 minutes from frozen.
- 🧰 Pro tips: Store in paper, slice-and-freeze (freezing pauses staling), lightly mist if no ice, preheat stone/tray, and scale time to loaf size.
- ⚠️ Safety and finish: Keep ice off heating elements, use heatproof vessels, and add a brief dry blast to restore shine and crackle on the crust.
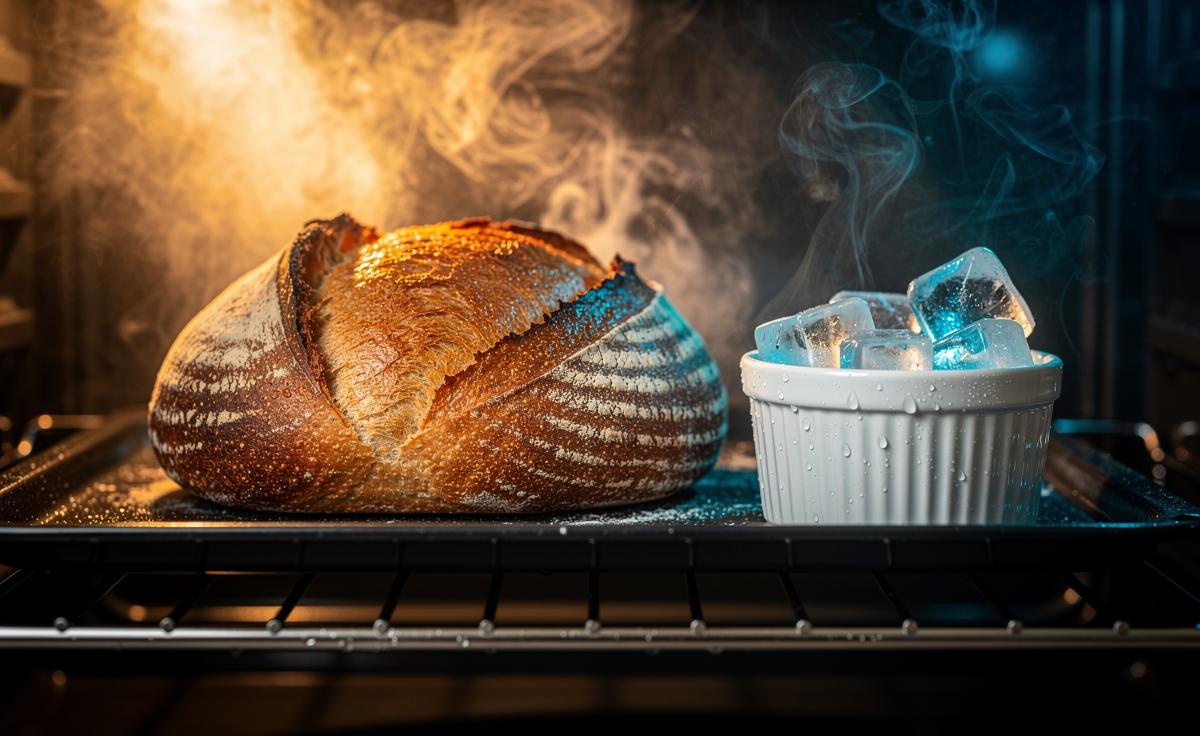
Yesterday’s loaf needn’t die today. With nothing more than a few ice cubes and a hot appliance, you can coax back springiness, fragrance, and that satisfying crackle in minutes. The trick sounds counterintuitive, yet it’s grounded in kitchen physics and bakery craft. Ice doesn’t just dampen; it becomes restorative steam. In practice, the method is quick, clean, and cheap. Five minutes can turn a disappointing, leathery heel into a lunch-worthy slice. Below, we unpack why the hack works, how to do it safely in an oven, air fryer or microwave, and when to draw the line. Bread waste falls, flavour returns. That’s a small domestic victory with a big aftertaste.
Why Ice Works: The Science of Softness
Staleness isn’t “drying out” alone. It’s chemistry. After baking, bread’s starches slowly set into rigid crystals, a process called starch retrogradation. Water migrates from the crumb to the crust, and the once-tender interior turns firm, even squeaky. Heat plus moisture reverses much of this. When you add ice to a hot environment, it melts, then flashes into steam, bathing the loaf with gentle vapour. That steam penetrates the crumb, loosening starch crystals and allowing them to re-gelatinise. The effect is targeted and fast.
Crucially, short exposure avoids sogginess. Steam softens the inside; a dry blast at the end revives the crust. Moisture goes in, then evaporates at the surface, restoring contrast. You taste the difference immediately: fresher aroma, livelier chew. This isn’t magic; it’s controlled rehydration. Many bakeries rely on steam-injected ovens for exactly this reason, shaping the crust and preserving tenderness. At home, an ice cube stands in for pro kit. It’s the simplest way to deliver moisture precisely when the starch network is most ready to relax again.
The 5-Minute Method: Oven, Air Fryer, and Microwave
The oven gives the most bakery-like finish. Heat to 180°C (160°C fan). Place the loaf or rolls on a tray. Pop 1–3 ice cubes into a small, oven-safe ramekin on the same tray—never on the element. Bake 3–4 minutes to steam, then 1–2 minutes to dry and crisp. For an air fryer, set 160°C. Put bread in the basket and a heatproof ramekin with an ice cube alongside. Cook 2–3 minutes, check, then 1–2 minutes more to sharpen the crust. Microwave offers speed, not crispness: put an ice cube in a microwave-safe mug beside the bread and heat at 600W for 20–30 seconds. Finish 1–2 minutes in a toaster for snap. Do not place ice directly on heating elements.
| Appliance | Ice | Temperature/Power | Time | Result |
|---|---|---|---|---|
| Oven | 1–3 cubes in ramekin | 180°C (160°C fan) | 3–4 min steam + 1–2 min dry | Soft crumb, crisp crust |
| Air fryer | 1 cube in ramekin | 160°C | 3–5 min total | Good lift, decent crunch |
| Microwave + toaster | Cube in mug | 600W + toaster | 20–30 sec + 1–2 min | Soft crumb, restored crust |
Small adjustments matter. Rolls need less time. Dense sourdough needs a touch more. If the crust looks dull, give it an extra 60 seconds of dry heat. The goal is steam first, then drying to reset the surface. That sequence delivers the “fresh bake” illusion without turning your loaf rubbery.
When to Use It, When to Bin It
This technique rescues stale bread, not spoiled bread. If you spot mould, whiffs of mustiness, or a damp, off texture, chuck it. No salvage hack neutralises mould toxins. Use the ice method on day-old baguettes, sourdough boules, ciabatta, and crusty rolls. Pre-sliced supermarket loaves respond too, though the crust won’t crisp dramatically without a toaster finish. Enriched breads—brioche, milk loaf—rehydrate beautifully, just reduce heat slightly to avoid scorching sugars.
Gluten-free bread can be revived, but it’s delicate: a brief, lower-temperature steam (150–160°C) is safer. If the loaf has been refrigerated, expect more stiffness; cold accelerates retrogradation. Let it come to room temperature, then apply steam. Frozen bread? Reheat from frozen with the same steps, adding 2–3 minutes. And if a loaf is simply beyond redemption—rock-hard, cracked open—redirect it. Blitz into breadcrumbs, make croutons, or cook a lush bread-and-butter pudding. Waste is the last resort.
Pro Tips for Lasting Freshness
Start with storage. Keep crusty loaves in a breathable paper bag or cut-side-down on a board, not sealed plastic, which traps moisture and softens the crust prematurely. For longer keeping, slice and freeze. Freezing pauses staling and locks in flavour. Reheat slices straight from the freezer with an ice-steam burst for startlingly fresh results. Before reviving, lightly mist the crust with water if you lack ice; the oven will turn it to steam all the same. A baking stone or preheated tray adds base heat, boosting crispness and speeding revival.
Think proportion. A massive boule needs more steam exposure; a dinner roll needs very little. Aim for gentle, even reheating—too hot and the crust scorches while the centre stays firm. Flavour hacks travel well with steam: a clove of garlic or a sprig of rosemary on the tray perfumes the loaf without getting in the way. Above all, be patient. Five careful minutes beats ten impatient ones every time.
With a few ice cubes and a thermometer-free eye, yesterday’s bread can sing again. It’s fast, frugal, and oddly satisfying, a micro-ritual that converts what you have into what you want. From a school-lunch roll to a Saturday sourdough, the same physics apply: steam first, dry second, eat third. The reward is a warm, fragrant loaf that tastes newly baked, even if it isn’t. Which loaf in your kitchen will you bring back to life tonight—and how will you top it when you do?
Did you like it?4.5/5 (30)