In a nutshell
- 🔥 Use a crumpled foil ball plus a thin coat of oil to create a polymerised oil film that forms a fast, durable non-stick surface on hot grates.
- 🛠️ Follow the 90-second routine: preheat to 230–260°C, scrub with foil, then wipe a whisper-thin layer of high-smoke-point oil (rapeseed, groundnut, grapeseed); test with bread for easy release.
- ✨ Enjoy cleaner cooking: improved release for fish and veg, sharper sear marks, fewer flare-ups, and better flavour because browning stays on the food, not the grates.
- 🧯 Prioritise Safety: avoid aerosol sprays over flames, don’t wrap grates in foil to preheat, keep a cool zone, and use an oiled foil sheet as a temporary surface for delicate proteins.
- 🔁 Maintenance matters: burn off residue post-cook, scrub warm with fresh foil, re-season after sugary or acidic marinades, and replace severely pitted grates.
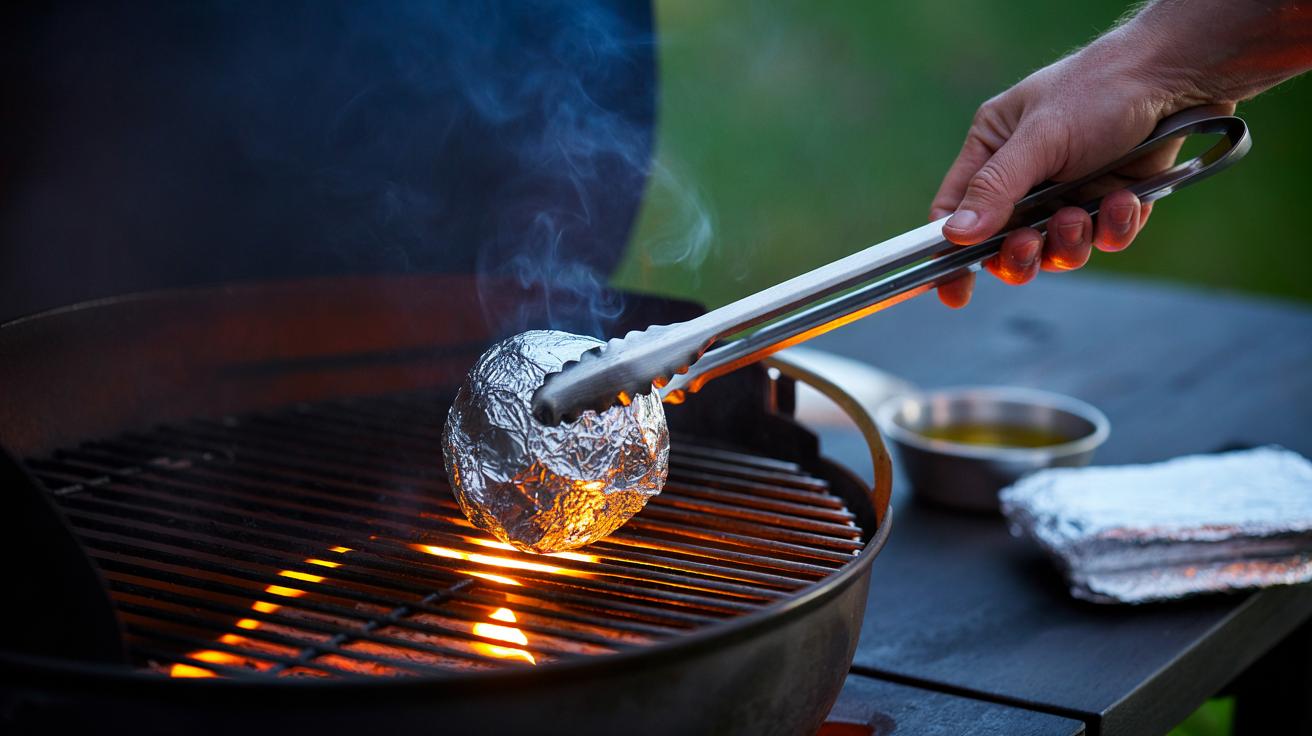
Scraped grates. Stubborn residue. Torn fillets. If your barbecue has ever welded supper to the metal, here’s a trick that feels like cheating. Grab aluminium foil and season the grill in seconds. No sprays. No mystery coatings. Just heat, oil, and a crumpled sheet. The science is simple yet satisfying: you’re creating a thin, polymerised oil film while smoothing the grate’s microscopic burrs. The result is a clean, low-friction surface that releases food on cue and sears beautifully. Fast seasoning with foil turns a temperamental grill into a reliable tool. And yes, it works on gas, charcoal, and even portable camping grills.
How Foil Seasoning Works in Seconds
Think of your grill bars as tiny mountain ranges. Food sticks on the peaks. A ball of aluminium foil acts like a gentle abrasive, knocking off friable rust and carbon without gouging the metal. As the grates heat to 230–260°C, you apply a thin sheen of oil that transforms. Under heat and oxygen, unsaturated fats crosslink into a hard, dry film—a micro-thin, quasi-ceramic layer often called “seasoning.” This layer lowers surface energy, so proteins have less incentive to bond. The foil’s scuffing increases the film’s mechanical keying, helping it cling to the steel rather than your steak.
There’s more. Hot metal expands, evening out small imperfections, while the oil migrates into pores you can’t see. Any residual moisture flashes to steam and lifts grit you missed, so the foil-and-heat combo performs a rapid refresh as you work. The effect is immediate: food releases cleanly, grill marks sharpen, and flare-ups drop because there’s less loose grease to ignite. The method mimics cast-iron seasoning, just sped up and adapted to grates, where airflow and thin metal demand a swift, controlled approach.
Step-by-Step: The 90-Second Foil Routine
Preheat the grill to a proper searing zone: 230–260°C for most proteins. While it climbs, crumple a sheet of foil into a tight ball the size of a cricket ball. Using tongs, scrub the hot bars firmly to shed carbon flakes and smooth snags. Now fold fresh foil into a pad, add a teaspoon of high-smoke-point oil (rapeseed, groundnut, or grapeseed), and wipe the bars with steady pressure. You’re not painting; you’re polishing. Excess drips invite flare-ups, so aim for a whisper-thin coat that looks satin, not glossy. Repeat once if the metal looks dry or patchy.
| Oil | Approx. Smoke Point (°C) | Flavour Impact |
|---|---|---|
| Rapeseed (Canola) | 205–220 | Neutral |
| Groundnut (Peanut) | 225–235 | Mild, clean |
| Grapeseed | 215–230 | Neutral |
Test readiness with a scrap of bread: place, count to five, turn. If it releases without tearing, you’re seasoned. If it clings, wipe once more with the oiled foil pad. Never spray aerosol oils onto open flames; decant oil to a ramekin and apply with control. Keep a cool zone on the grill for safety. Once seasoned, cook straight away—proteins respond best to hot, stable bars that have just been primed. Between batches, a quick dry scrub with the foil ball keeps the film intact without flooding the surface with fresh oil.
Safety, Taste, and Maintenance Tips
Foil seasoning is quick, but a little discipline protects your kit and your dinner. Avoid perfumed oils; they scorch and mask smoke. Don’t wrap grates tightly in foil during preheat—restricted airflow can overheat burners and warp parts. Instead, keep foil mobile and in your tongs. For delicate fish or halloumi, season as above, then use a lightly oiled foil sheet as a sacrificial surface for the first minute of contact. Slide it away once the crust forms. This hybrid approach delivers crisp edges without sticking or steamy skins.
After cooking, burn off residue for five minutes, then scrub with a fresh foil ball while warm. Close the lid to deter rust. If you’ve used sweet glazes or acidic marinades, re-season before the next session; sugars and acids erode the film. Replace severely pitted grates—seasoning can’t fix craters. Concerned about aluminium? The contact is brief and at temperatures well within domestic norms; you’re not leaving foil behind. Crucially, a thin, polymerised layer improves flavour by keeping Maillard browning where it belongs—on the meat, not glued to the grate.
In one minute you can reset your grill’s temperament. The foil ball cleans. The oiled pad seasons. Heat does the rest. The payoff is crisp-skinned chicken, intact fillets, and vegetables that char, not shred. A primed grill is easier to cook on and easier to clean, which means more midweek barbecues and fewer Saturday scrubs. Ready to try the 90-second routine before your next cookout—and if you do, which food will you test first: a fragile piece of fish, or a bold, sticky glaze that previously gave you grief?
Did you like it?4.6/5 (28)