In a nutshell
- 🐌 Copper tape deters snails instantly via a mild electrochemical reaction with their mucus—repellent, not toxic—providing a humane, contact-based barrier.
- 🛠️ Proper setup matters: clean surfaces, apply a continuous ring (20–30 mm pots; 30–50 mm rough timber), burnish joins, remove bridges, keep soil below the band, and consider dual staggered bands for stubborn routes.
- 📍 Best targets: containers, raised-bed rims, greenhouse legs, and cold frames—any spot where molluscs must cross the metal; gaps as small as 5 mm defeat the barrier.
- 💷 Value and longevity: typical cost £4–£10 per 10 m, lifespan 1–3 seasons; cleaning maintains conductivity; unlike pellets or beer traps, it doesn’t invite more pests and pays back in saved crops.
- 🌿 Eco credentials: suits organic gardens, protects edibles without runoff risks, and coexists with wildlife and pets; pair with night hand-picking to reduce background pressure.
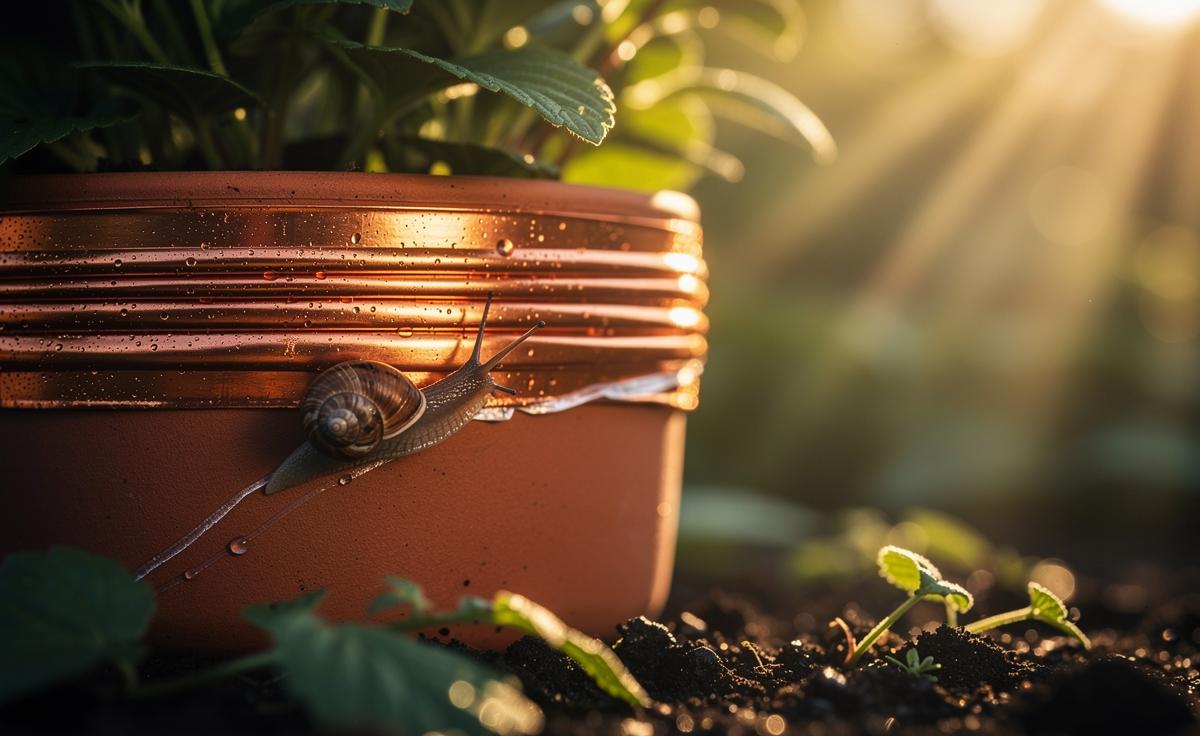
Gardeners across the UK know the heartbreak: a hosta razed overnight, a line of silvery trails glinting like a calling card. There’s a quietly brilliant fix that doesn’t rely on pellets or poisons. Copper tape creates a clean, lasting barrier that turns curious molluscs away at the threshold. The science is elegant. The application is straightforward. The impact can be instant. Copper doesn’t kill; it deters, giving you a humane, wildlife-friendly line of defence that still leaves hedgehogs, birds, and pets unharmed. If you’ve tried grit, coffee grounds, or crumbled shells with patchy results, this metal strip offers something rare in the garden world: repeatable outcomes, less faff, and visible protection.
Why Copper Repels Snails Instantly
Slug and snail movement depends on a conductive mucus. When that slime touches copper, a tiny electrochemical reaction occurs, creating an unpleasant tingling—often described as a mild “shock.” It’s not dramatic, but it’s decisive. The animals recoil and choose another route. The deterrent effect is immediate and contact-based, which means you’re not broadcasting chemicals into soil or risking non-target species. This makes copper tape a clever barrier for organic gardeners, balcony growers, and anyone trying to protect edibles without resorting to bait.
Another advantage is predictability. Unlike scatter-shot solutions that degrade after rain or flake away, a continuous copper ring forms a fixed perimeter that works day and night. It’s especially effective on smooth, vertical surfaces—pots, raised bed edges, staging legs—where molluscs have to cross the metal to advance. Keep in mind that physics rules the result: if there’s a gap, a bridge of leaves, or a soil spill over the copper, snails will exploit it. Gaps as small as 5 mm can become gateways. Integrity matters as much as material.
How to Apply Copper Tape Correctly
Preparation determines performance. Clean the surface first with a little soapy water or methylated spirits, then dry thoroughly. Peel and stick the copper tape in a smooth band around pots, trunks, or bed edges. Aim for at least 20–30 mm width; wider is better on rough timber. Use a continuous ring—no breaks, no overlaps that leave raised seams. Where you must join, butt edges tightly and burnish with a spoon to eliminate gaps. On porous wood, add small brass pins or staples to support the adhesive without puncturing the copper’s top edge.
Think like a snail. Remove “bridges” such as trailing leaves, labels, or ties that arc over the barrier. Keep mulch and soil a few centimetres below the copper band; top-ups can create ramps in a week. If the metal tarnishes, it still works, but heavy grime masks conductivity, so wipe seasonally with a scourer. For bed frames, two staggered bands 10–15 mm apart increase the deterrent stimulus. Clean copper is crucial when numbers surge after rain. Finally, position the tape before peak feeding seasons—spring flush and warm, wet summer nights—so plants are protected during their tender growth phases.
Costs, Lifespan, and Where It Works Best
Copper tape isn’t a silver bullet for an entire garden, but applied strategically it’s superb value. Focus on high-risk zones: salad planters, raised beds, cold frames, and greenhouse benches. Containers shine because they’re self-contained; one neat ring, and your lettuce is safe. For timber beds, the outer rim is ideal, keeping the barrier dry and visible. Greenhouse staging and water-butt stands also benefit, stopping stealthy climbs after dusk. Defend the perimeter you can actually control, then hand-pick stragglers beyond it to reduce overall pressure.
| Item | Typical Guidance (UK) |
|---|---|
| Recommended width | 20–30 mm for pots; 30–50 mm on rough timber |
| Placement | Around pot rims, raised-bed edges, greenhouse legs, cold frames |
| Lifespan | 1–3 seasons; clean to extend, replace if lifting or corroded |
| Cost range | Approx. £4–£10 per 10 m roll, depending on width |
| Eco and pet safety | Repellent, not toxic; avoids pellets and runoff risks |
Compared with pellets, costs flatten over time because a single ring keeps working after downpours. Unlike beer traps, copper doesn’t lure more pests into the area. And it dodges the myths: eggshells and coffee grounds rarely deter in wet weather. Get the seal right and the tape pays for itself in saved harvests, especially for leafy crops and tender ornamentals targeted night after night.
The charm of copper tape is its simplicity: a narrow strip, a little care, and a big effect. It respects the food web, protects your plants, and applies in minutes. If you’re fed up with scattergun remedies, choose a barrier that does one thing brilliantly—stop the climb. Start with your most vulnerable containers and beds, watch the bite marks vanish, then expand where pressure remains high. Where would a precise, humane, and chemical-free barrier make the most difference in your garden this season?
Did you like it?4.6/5 (23)