In a nutshell
- 🧪 Why it works: Olive oil rehydrates leather’s collagen fibres while white vinegar lifts salt and alkaline grime; patch-test first, as vinegar can dull wax and excess oil may darken finishes.
- 🥾 Method in brief: Wipe with a 1:3 vinegar:water mix, air-dry 30–45 minutes, apply a few drops of oil in thin coats, buff, then seal with cream polish; never dry with heat and avoid suede, nubuck, and patent.
- ⚖️ Pros vs. cons: Accessible and effective for salt rings and quick conditioning, but risks include darkening, rancidity if overused, and incompatibility with delicate finishes—specialist balms or a cobbler are better for structural damage.
- 🛠️ Troubleshooting: Tacky feel = too much oil (blot with talc), cloudy finish needs longer buffing and a dab of cream, persistent rings get a second diluted-vinegar pass; maintain cadence with cedar shoe trees and rotation.
- 🌧️ UK-ready routine: Regular vinegar pre-clean prevents road-salt halos, light oiling restores suppleness, and monthly polish extends life between services—remember, less is more for lasting results.
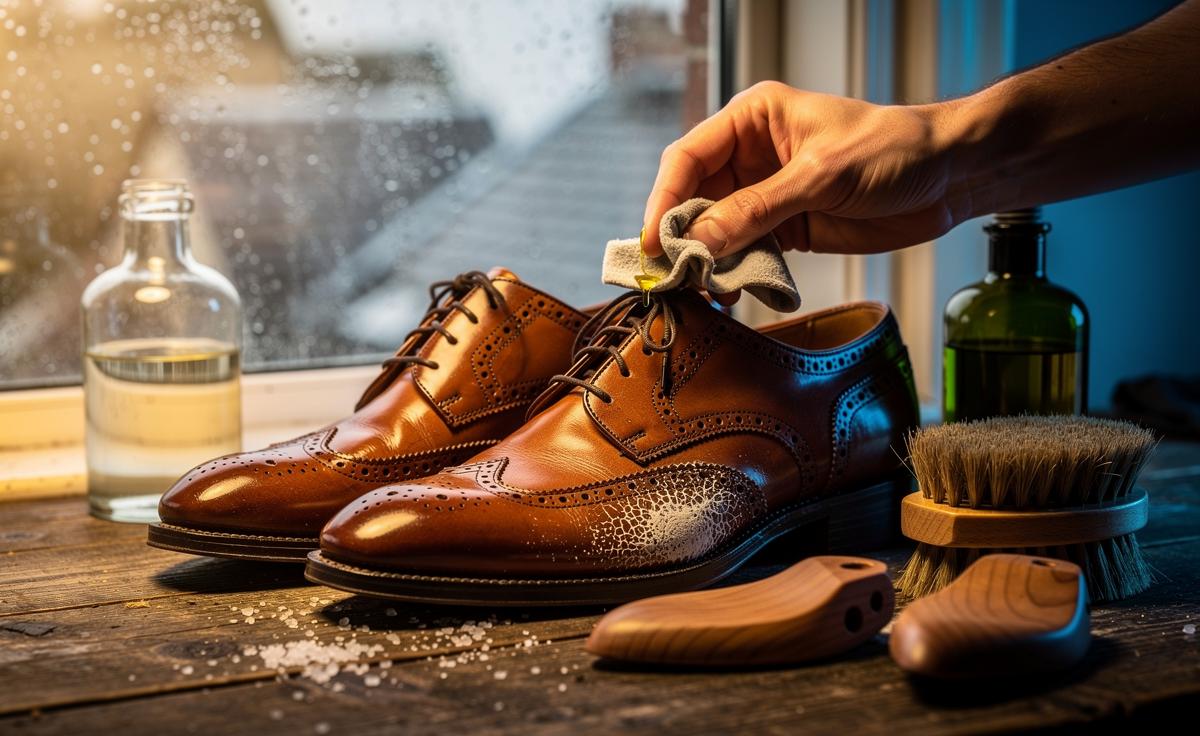
If your leather shoes are fading, stiff or salt-stained, a kitchen-cupboard duo can help: olive oil and white vinegar. Used thoughtfully, they clean, rehydrate and revive finish without specialist cost. The trick is knowing when to combine them, when to split their roles, and how to avoid over-conditioning that attracts dirt. As a UK journalist who spends weekends rescuing brogues and Chelseas from British weather, I’ve field-tested methods that stand up to drizzle, road salt and office commutes. The golden rule is restraint: light applications, ample drying time, and regular maintenance. Below is a clear, evidence-led routine plus troubleshooting to extend shoe life and preserve that supple, confident creak.
Why Olive Oil and Vinegar Work on Leather
Leather is tanned animal hide: a mesh of collagen fibres that dries out with exposure to heat, grit and water. Olive oil is rich in triglycerides that can slip between those fibres, restoring flexibility and reducing surface cracks. White vinegar (usually 5% acetic acid) excels at dissolving salt stains and breaking down alkaline grime from pavements, which leather tends to absorb. Used together—carefully diluted—vinegar lifts deposits so oil can condition evenly. Always patch-test on an inconspicuous area and wait 24 hours; different finishes (full-grain, corrected grain, aniline) respond differently.
Chemistry matters. Vinegar’s acidity neutralises white tide lines from winter grit, but it can strip wax polish if applied neat. Olive oil penetrates quickly, yet too much can soften structure, darken colour and, if left wet, go rancid over time. That’s why the method below emphasises thin coats and proper drying. In practical terms: vinegar is your cleaner, olive oil your conditioner. Don’t expect olive oil to “fix” scratches or deep scuffs; it won’t replace lost pigment. For colour repair, you’ll need cream polish after conditioning.
Step-by-Step: Cleaning, Conditioning, and Protecting
Start with dry shoes and remove laces. Stuff with newspaper or use shoe trees to hold shape. Work on dust-free surfaces and keep a soft cloth and horsehair brush to hand. Never use this method on suede, nubuck, patent or exotic skins; it’s for smooth leathers only.
- Clean: Mix 1 part white vinegar to 3 parts water. Dampen a cloth, wring thoroughly, and wipe the shoe in small circles, focusing on salt lines and toe caps.
- Dry: Air-dry 30–45 minutes away from radiators; heat can crack leather.
- Condition: Apply 3–4 drops of olive oil to a clean cloth. Massage lightly over panels, avoiding welts and stitches. Wait 15 minutes, then buff with a brush.
- Seal: If colour looks even, finish with a thin layer of cream polish; this adds pigment and a gentle barrier.
Here’s a quick-reference table to keep ratios and timing simple:
| Purpose | Mix | Method | Notes |
|---|---|---|---|
| Salt/grime removal | 1:3 vinegar:water | Light wipe; no soaking | Test finish; may dull wax |
| Conditioning | Olive oil neat (few drops) | Thin coat; buff after 15 min | Repeat only if leather looks dry |
| Colour restore | Cream polish after oil | Pea-sized amount per panel | Match shade; build slowly |
Less is more. If you can see a sheen of wet oil, you’ve used too much. Blot, let it absorb, and buff. A quarterly routine suits most office wear; weekly light cleaning is sensible in wet months.
Pros vs. Cons and Why Olive Oil Isn’t Always Better
Pros:
- Accessible and affordable; likely already in your kitchen.
- Gentle cleaning from diluted vinegar, especially on salt rings.
- Quick conditioning for stiff vamps and squeaky quarters.
Cons:
- Potential darkening on pale or aniline leather.
- Rancidity risk if over-applied or stored damp, leading to odour and dirt attraction.
- Not suitable for suede, nubuck, patent, or very soft glove leathers.
Olive oil is not a cure-all. If your shoes are waterlogged, split at the welt, or deeply scuffed, conditioning helps comfort but not structure. In those cases, use a cobbler for re-welting or edge repairs and reach for shoe cream to restore colour. For heavy-duty conditioning, specialist products—like lanolin-based balms or neatsfoot-blend conditioners—offer longer-lasting protection. That said, in Britain’s salty winters, the vinegar pre-clean step is a standout: it prevents that chalky halo that can etch into the finish, so subsequent oil and polish actually take evenly.
Troubleshooting and Expert Tips From the Boot Room
In an at-home test on three pairs (tan brogues, black derbies, oxblood Chelseas), a single vinegar wipe and micro-dose of olive oil softened creases and removed salt rings without blotching. The tan pair darkened half a shade—expected—and evened out after one coat of neutral cream. If your leather clouds or feels tacky, you’ve either used too much oil or not dried after cleaning.
- Cloudy finish: Buff longer; add a tiny touch of cream polish to level.
- Persistent salt ring: Repeat the 1:3 vinegar wipe once; avoid scrubbing.
- Oily patches: Blot with cornflour or talc overnight; brush off.
- Mildew smell: Air-dry with shoe trees; wipe lightly with the diluted vinegar mix; condition sparingly.
- Winter routine: Wipe after each wet outing, condition fortnightly, polish monthly.
For long-term care, think cadence more than quantity. Two minutes after a commute saves an hour later. Never dry on radiators; the heat shocks fibres. Rotate pairs to let sweat evaporate, use cedar shoe trees to maintain shape, and keep shoes off damp floors. When in doubt, a professional cobbler can advise on finish type before you begin.
Handled with care, olive oil and white vinegar are a smart, budget-friendly duo for UK shoe racks braving rain and road salt. They won’t replace a cobbler or a good polish, but they will stretch the healthy life of leather between services and keep everyday pairs looking lively. As you look at your own collection—office staples, weekend boots, perhaps a cherished pair for weddings—where could a lighter, more regular routine make the biggest difference, and which pair will you rescue first?
Did you like it?4.5/5 (23)