In a nutshell
- 🍋 Lemon’s citric acid loosens grime, thins silver sulphide, and complexes copper oxides in sterling—ideal for light to moderate tarnish; for deep blackening, pair with an aluminium foil and bicarbonate bath.
- 🧽 Mix lemon juice with a little water (optional fine salt), use a damp microfibre cloth to wipe gently, then neutralise, rinse, dry immediately; expect 2–5 minutes per piece for visible shine.
- ⚠️ Go light on plated EPNS and avoid salt; never use acids on porous stones (pearls, opal, coral, turquoise, lapis, malachite) or enamel/resin; test first and stop if you spot pitting or rainbow sheen.
- 🗄️ Preserve brightness: wipe after wear, store airtight with anti-tarnish strips or silica gel, keep away from sulphur sources; for periodic care, use a foil-and-bicarbonate reduction, then a lemon wipe for clarity.
- ✨ Expect a quick treatment that’s gentle on detail and patina—less abrasion, fewer chemicals, and a clean, mirror-like finish with confident control.
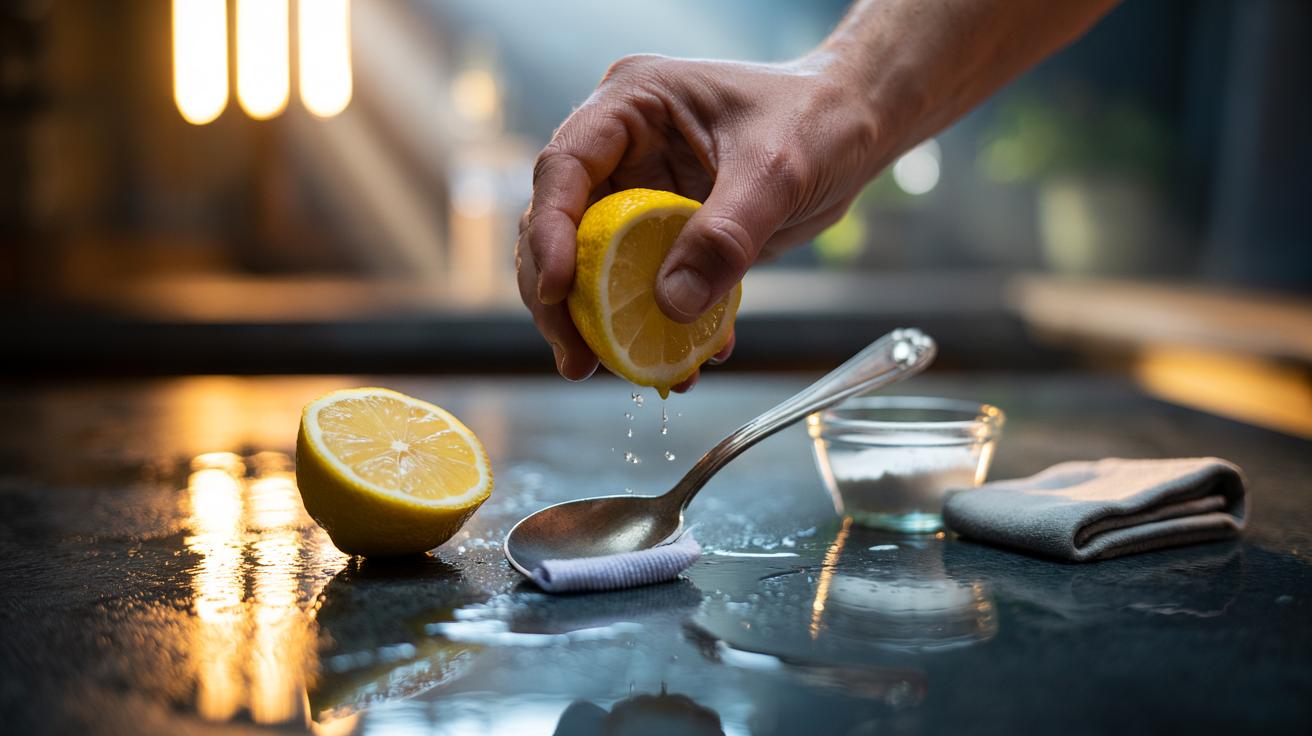
When your favourite silver goes from twinkle to tired, the fix might already be on your kitchen counter. Fresh lemon delivers a swift, satisfying response to light tarnish, restoring a crisp, mirror-like gleam with minimal kit and even less fuss. The secret is the fruit’s gentle acidity and natural chelating power, loosening grime while softening the dark veil that makes silver look flat. Add a pinch of finesse and the right wipe-down, and you’ll see results in minutes. This is a quick, targeted treatment for light to moderate tarnish, not a rescue mission for blackened heirlooms. Here’s the science, the method, and the caveats—clearly laid out.
Why Lemon Works on Tarnished Silver
Silver dulls as it reacts with sulphur in the air to form silver sulphide, a dark layer that masks the metal’s brightness. Fresh lemon juice, rich in citric acid, helps in three ways. First, it disrupts surface grime and oils that lock tarnish in place. Second, it can complex trace copper oxides found in sterling (92.5% silver, 7.5% copper), which contribute to a yellow-brown cast. Third, gentle acidity primes the layer for mechanical lift-off by a soft cloth. This is chemistry working with touch, not a miracle bath dissolving metal.
Lemon alone does not fully “reverse” silver sulphide, but it loosens and thins it enough for a controlled polish. That’s why the technique shines on lightly greyed cutlery, frames, bangles, and chain. It’s also kinder than harsh abrasives that scratch patinas or round off crisp engraving. Add a tiny pinch of fine salt and you increase bite—still light, still manageable—provided you polish in straight lines along the grain and avoid heavy pressure. The result: brighter highlights, preserved detail.
There are limits. Deep, charcoal tarnish signals a thick sulphide layer that resists weak acids. In those cases, pair the lemon stage with the well-known aluminium foil and bicarbonate reduction bath, or use a specialist silver dip for a short, supervised soak. Know your piece before you proceed: a little knowledge prevents a lot of regret.
Step-by-Step Quick Treatment
Clear a clean sink. Line the base with a soft towel to protect knocks. Squeeze a fresh lemon; sieve out pips. In a small bowl, mix two tablespoons of juice with a teaspoon of warm water. For light bite, stir in a tiny pinch of fine salt; skip it for ultra-delicate items. Dampen a microfibre cloth in the solution and wring it nearly dry. Wipe the silver slowly, turning the cloth as it greys. Use a soft brush to reach crevices, always gentle, always controlled.
| Item | Quantity | Purpose |
|---|---|---|
| Fresh lemon juice | 2 tbsp | Acid to loosen tarnish and oils |
| Warm water | 1–2 tsp | Dilution for control |
| Fine salt (optional) | Pinch | Ultra-mild abrasion for grip |
| Microfibre cloth | 1 | Lifts thinned tarnish without scratching |
| Bicarbonate of soda | 1 tsp | Neutralising rinse after polishing |
Rinse is non-negotiable. Prepare a bowl of warm water with a teaspoon of bicarbonate of soda; swish the silver briefly to neutralise acid and halt reaction. Follow with plain water, then blot dry immediately. Do not air-dry; moisture invites fresh tarnish and spotting. Finish with a clean, dry cloth for a final burnish. Time on task? Two to five minutes per piece, tops. If areas remain stubborn, repeat once rather than scrubbing harder. Precision beats force, every time.
Safety, Risks, and When to Avoid
Not all sparkle is created equal. Plated silver (electroplated “EPNS”) carries a thin coat of silver over base metal; aggressive rubbing can reveal brass beneath. Keep pressure feather-light and skip salt on plated items. Heirlooms with intentional blackened recesses—oxidised finishes that add depth—should be approached with restraint: clean only the raised surfaces, preserving the designed contrast. If the piece tells a story, don’t polish the plot away.
Avoid lemon on jewellery set with porous or delicate stones: pearls, opal, coral, turquoise, lapis, malachite. Acids and liquids attack their surface or creep under glued settings. Enamel and resin inlays can cloud or lift with careless soaking. Never soak gem-set jewellery in acidic solutions; targeted, damp-cloth cleaning is the rule. Also beware of hollow-handled knives, where liquid seeping into joins can unsettle cement. Wash, but don’t flood.
Check hallmarks before you begin. Sterling (“925”) tolerates the method well; coin silver and low-grade alloys may react unpredictably. If you spot pitting, flaking, or a rainbow sheen, stop and reassess—these are red flags for over-cleaning or underlying corrosion. When in doubt, a professional clean or the controlled aluminium-bicarbonate bath is safer than guesswork. Small trials on an inconspicuous patch can save a family treasure.
Make the Shine Last: Aftercare and Storage That Work
Preventing tarnish beats polishing it. After each wear or use, wipe silver with a dry microfibre to lift skin oils and sulphur traces from cosmetics or cooking. Store pieces in airtight pouches with anti-tarnish strips or silica gel. Keep away from rubber bands, wool, felt, and eggs—the quiet sulphur sources that darken silver in days. Wear your jewellery regularly; gentle friction from daily life keeps it lively, while a drawer accelerates dullness.
For tableware, rinse promptly after contact with eggs, onions, or mustard, then dry thoroughly. A monthly five-minute lemon refresh maintains sheen without resorting to heavy polishes that remove metal atom by atom. If a deeper clean is needed, use the foil-and-bicarbonate method first to reduce sulphides, then the lemon wipe for brightness and feel. Short, light, and frequent beats long, harsh, and rare. It’s a greener habit, too—kitchen acids and mild bases instead of solvent-laden creams, less waste, more control.
Mark a simple routine: a quick wipe after use, a protective pouch, a calendar nudge for a light clean. Your future self will thank you, and your silver will keep that crisp, mirror flash that makes a table sing and a wrist glow.
Lemon-led polishing is fast, tactile, and reassuringly simple. It respects the metal while giving you visible results in the time it takes to brew tea. You gain agency over brightness and patina rather than surrendering both to harsh dips. Remember: neutralise, rinse, and dry—those three steps lock in the win. Ready to line up your dulled spoons, bangles, or photo frames and try the method today—or do you have a particular piece whose story makes you hesitate, and why?
Did you like it?4.3/5 (30)