In a nutshell
- ✨ A simple paste of baking soda (bicarbonate of soda) lifts mould and grime from grout fast, using mild alkalinity plus fine abrasion to clean effectively without harsh chemicals.
- 🧪 Method in minutes: mix 3 tbsp baking soda with warm water to a toothpaste-like paste, apply, leave for 10 minutes, scrub with a soft brush, rinse thoroughly, and dry to lock in the clean.
- 🧰 Smart tweaks: add a drop of washing-up liquid for soap scum; spot-treat stubborn stains with 3% hydrogen peroxide after scrubbing—never combine with bleach.
- ⚠️ Safety first: ventilate, wear gloves, avoid aggressive scrubbing on weak grout, and investigate persistent black mould as a possible ventilation or leak issue.
- 🛡️ Prevention wins: post-shower squeegee, quick weekly baking soda swipe, seal grout twice yearly, and replace failed silicone to keep lines bright longer.
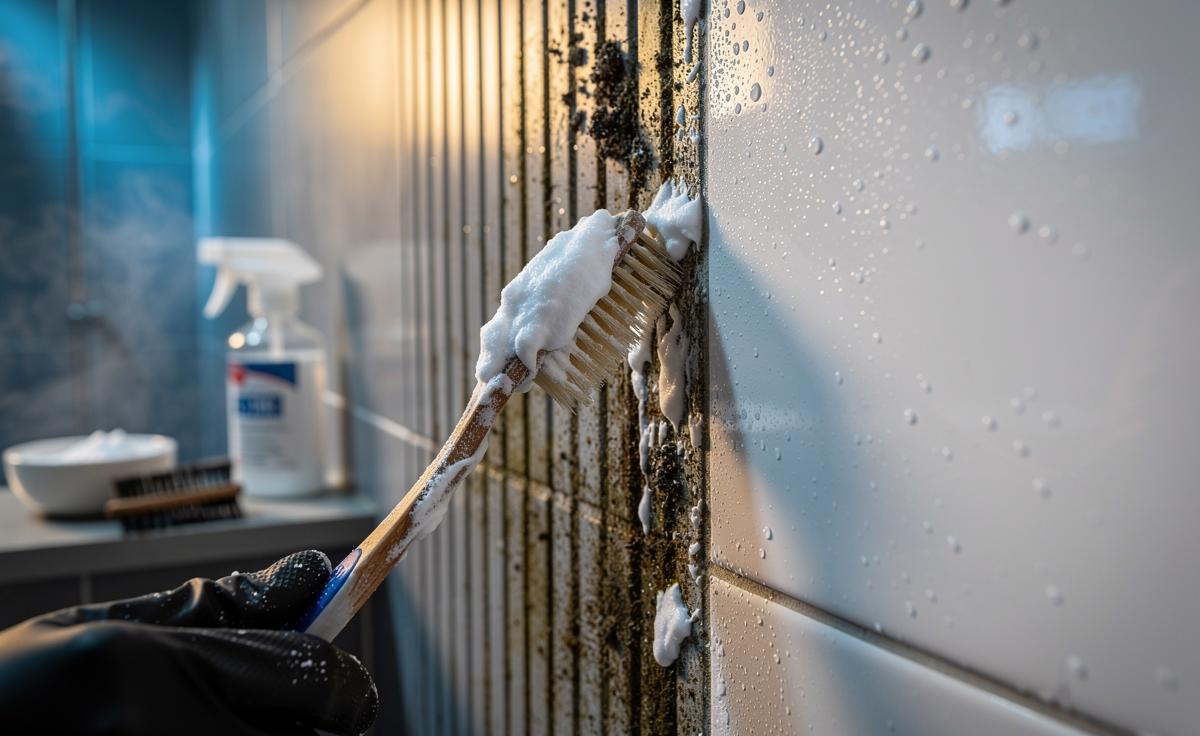
Even the brightest bathroom can be betrayed by dingy grout. The good news is you don’t need industrial chemicals or a weekend of scrubbing. A humble tub of baking soda — or, as it’s known in Britain, bicarbonate of soda — becomes a powerful cleaning paste that clears mould and grime in about ten minutes. It’s cheap, low-odour, and gentle on most tiles. With a little technique and the right dwell time, it cuts through the biofilm that helps mildew cling on, restores the pale lines between tiles, and leaves the shower smelling fresh. Time your work, let the paste sit, and remove it thoroughly for a safer, faster clean.
Why Baking Soda Paste Lifts Grime Fast
Baking soda paste works because it combines mild alkalinity with fine, non-scratching abrasion. That dual action loosens the biofilm holding soap scum, body oils and mould pigments to your grout. The paste traps moisture against the stain, extends contact time, and allows mechanical action to do the rest. In practical terms, you’re making a targeted scrub that stays put on vertical joints. Leave the paste in place for up to 10 minutes before scrubbing for best results. The dwell time softens buildup, so you use less elbow grease and protect the grout surface.
On a chemical level, sodium bicarbonate is a weak alkali that helps break down fatty residues, while its gentle grit dislodges particles without gouging the grout. It is far kinder than pumice or powdered scouring agents and safer than harsh acids on cement-based lines. A small splash of warm water turns powder into a spreadable paste; a drop of washing-up liquid adds surfactant slip. For stains with a mouldy tinge, pairing with 3% hydrogen peroxide boosts oxidation — just don’t combine with bleach.
The 10-Minute Method: Mix, Spread, Scrub, Rinse
Start with ventilation. Open a window or run the extractor. Put on washing-up gloves and a simple mask if mould is visible. In a ramekin, mix three tablespoons of bicarbonate of soda with enough warm water to form a thick paste — think toothpaste, not soup. Add one drop of washing-up liquid if the grout is particularly greasy. Spread the paste along the grout lines with an old toothbrush or a small grout brush, coating evenly but not flooding. Work from top to bottom so you’re not drip-chasing your own progress.
Now wait. Set a timer for 10 minutes. Use those minutes to clean taps or squeegee the glass; the contact time is doing the heavy lifting. When the timer pings, scrub the lines with short, firm strokes. Don’t press so hard you crumble grout. Rinse thoroughly with warm water, then wipe with a microfibre cloth to lift remaining residue. For stubborn mould shadows, dab 3% hydrogen peroxide on a cotton bud, leave five minutes, and rinse again. Dry the area; moisture feeds mildew. Always finish by drying — it’s the step that keeps the clean lasting.
Ratios, Tools, and Quick Comparisons
Getting the proportions right saves time and mess. The table below summarises the core paste mix, options for tougher stains, and what to reach for when you’re pressed for time. Keep it simple, and you’ll get predictable results without damaging your grout or tiles.
| Task | Ratio/Ingredient | Tool | Dwell Time | Notes |
|---|---|---|---|---|
| General grime | 3 tbsp baking soda + 1–2 tsp warm water | Soft toothbrush | 10 minutes | Gentle, safe on most grout |
| Greasy soap scum | Paste + 1 drop washing-up liquid | Grout brush | 8–10 minutes | Improved slip and lift |
| Mould staining | Paste, then 3% hydrogen peroxide spot | Cotton bud | 5 minutes (peroxide) | Do not mix with bleach |
| Quick refresh | 1 tbsp paste for 1 m² | Microfibre cloth edge | 5–7 minutes | Good between deep cleans |
Keep the paste thick enough to cling; runny mixtures waste time and reduce abrasive action. A nylon-bristled brush gives control without scratching glazed tiles, and a plastic scraper can lift heavy deposits before you paste. Always rinse until the water runs clear — leftover grit attracts grime.
Safety With Mould and Bleach Myths
Mould needs moisture and a foothold. Bathrooms offer both. While bicarbonate of soda helps remove the film that mould clings to, deeper colonies may require an oxidiser. Use 3% hydrogen peroxide on dark specks after the paste clean, then rinse and dry. Never mix bleach with vinegar or ammonia; the fumes can be dangerous. Although baking soda isn’t acidic, it can neutralise bleach’s effect and kick up irritating aerosols when scrubbed together. Keep methods separate and simple to stay safe.
Wear gloves, avoid vigorous brushing on crumbling grout, and ventilate well. If you see extensive black mould across walls or a musty smell persists, it may signal a ventilation or leak problem — cleaning alone won’t cure it. Check extractor performance, run it for 15 minutes after showers, and consider resealing grout that’s powdery or pitted. If household mould triggers symptoms, pause and seek professional advice before tackling large areas. The smartest clean is the one that fixes the cause as well as the cosmetic issue.
Keep Grout Whiter for Longer
Prevention beats crisis cleaning. After each shower, a 30-second squeegee and a quick towel-off of grout lines deny mould the moisture it craves. Once a week, run a baking soda swipe: a teaspoon of dry powder on a damp cloth, light rub, rinse, dry. Open the window, crack the door, and let air move. If you’ve got hard water, a monthly white vinegar spray on tiles (not on natural stone) reduces limescale that shelters grime — just rinse before applying any alkaline paste later.
Seal cement grout twice a year to repel stains; it makes every future clean faster. Replace failed silicone seals so water doesn’t wick into corners. Little routines, done regularly, are the secret to grout that stays bright without heroic scrubbing. And don’t overdo it: aggressive scouring shortens grout life. Gentle method, short dwell, thorough rinse, full dry — that’s the cycle that works, and it works quickly.
With a bowl, a brush and a spoon of bicarbonate of soda, you can restore shower grout in the time it takes the kettle to boil twice. It’s thrifty, low-tox and easy to repeat, which means your tiles stay fresher between deep cleans. The trick is patience during the dwell and diligence during the rinse and dry. Give the paste 10 minutes and it will give your grout a new lease of life. What will you change first — your cleaning products, your technique, or your after-shower habits?
Did you like it?4.5/5 (20)