In a nutshell
- 🧪 The science: coffee grounds have porous, carbon-rich surfaces that use adsorption to trap fridge VOCs, especially from onion, garlic, fish and dairy; slight humidity boosts performance, but capacity is finite, so refresh weekly.
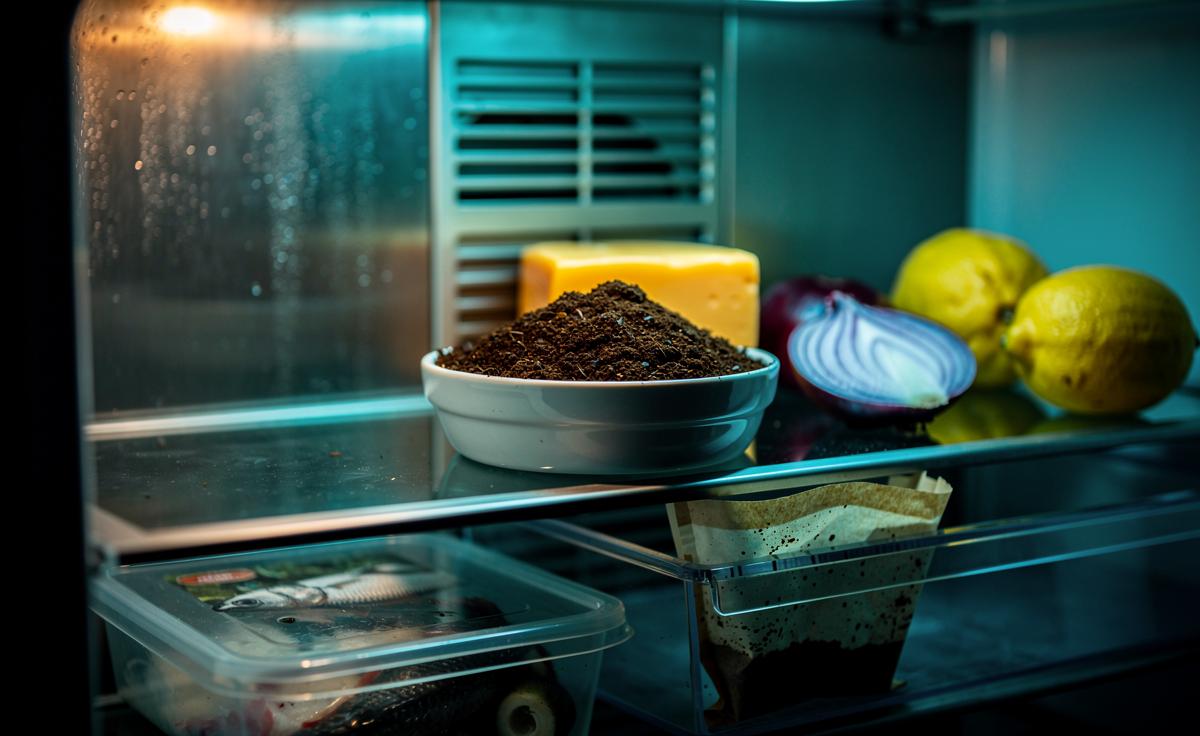
- 🔧 How-to: dry used grounds (12–24 hours air-dry or 90–100°C for 30–40 minutes), place in shallow dishes or breathable sachets, position where air circulates, and refresh every 5–7 days (3–4 for strong odours); compost when spent.
- 📊 Comparison: Grounds are free, sustainable and compostable; baking soda is tidy but weaker on sulphuric/fishy notes; activated charcoal is strongest but pricier—choose based on odour intensity, budget, and sustainability goals.
- 📍 Smart placement: Use two small dishes (rear vent + cheese/produce area), 2–4 tbsp each; keep dry, avoid blocking vents, bin any that contact meat juices, and consider sachets for spill-prone shared fridges.
- ♻️ Big takeaway: A frugal, circular solution that genuinely reduces odour; pair with a monthly bicarbonate-of-soda wipe-down, and scale up to charcoal only for persistent smells.
If opening your fridge is like confronting a gust of week-old onion, there’s a simple, sustainable fix hiding in your cafetière. Coffee grounds—especially already-brewed ones—are naturally porous and remarkably good at trapping odours. Unlike perfumed sprays that mask smells, grounds rely on carbon-rich particles that latch onto volatile molecules and moisture. That means fewer funky compounds floating around to assault your senses. It’s an elegant, circular solution: enjoy your morning brew, then enlist the remnants to rescue your fridge. Below, I explain the science, show exactly how to deploy grounds for maximum effect, and compare them to baking soda and activated charcoal so you can pick the best tool for your kitchen.
The Science: Why Coffee Grounds Absorb Fridge Odors
Coffee beans are heated during roasting, producing a carbon-rich matrix threaded with microscopic pores. Those pores give spent grounds a high surface area—a perfect landing pad for volatile organic compounds (VOCs) that cause off smells. The effect is largely adsorption (odour molecules clinging to surfaces) rather than absorption (soaking into a material), and it’s boosted by the slight humidity of a fridge. Water molecules help shepherd stink-causing compounds toward the porous carbon, where they stick. In short: the texture you feel between your fingers is precisely what snares odours.
Used grounds are especially effective for kitchen smells such as garlic, onion, fish, and lingering dairy notes. They also retain faint coffee aromatics that can gently neutralise—rather than perfume—your fridge space. Importantly, grounds don’t release chemicals back into the environment; once a molecule is adsorbed, it tends to stay put until the grounds are refreshed. That said, the capacity is finite. As pores fill up, performance dips, which is why a regular refresh schedule matters. For most UK households, a weekly rotation balances efficacy with convenience.
Step-By-Step: Turn Yesterday’s Grounds Into a Fridge Deodorizer
Transforming leftovers from your morning brew into an odour sponge is straightforward. The key is drying for safety and performance, then placing grounds where air circulates.
- Brew as normal, then spread used coffee grounds thinly on a tray or kitchen towel.
- Air-dry 12–24 hours, or oven-dry at 90–100°C for 30–40 minutes. Drying prevents mould and boosts adsorption by opening pores.
- Spoon grounds into a shallow dish, ramekin, or a breathable sachet (paper coffee filter tied with string).
- Place near odour sources: deli drawer, cheese box, or back shelf where airflow is steady.
- Refresh weekly for general smells; every 3–4 days after pungent foods (fish curry, ripe cheeses).
- Dispose via food waste caddy or compost; coffee grounds are garden-friendly.
Pro tip: rotate two small dishes rather than one large. That increases contact area and lets you swap a single dish midweek if the fridge is especially “fragrant.” For large fridges, use 2–3 small ramekins at different heights to catch odours riding in different airflow paths. Never leave wet or clumped grounds in a sealed container—they can mildew and worsen smells. If you prefer a tidier look, tuck a filter sachet behind the top shelf lip; it’s invisible but still effective.
Pros and Cons Compared With Baking Soda and Charcoal
How do coffee grounds compare with the staples? Use the right tool for your fridge’s quirks, budget, and sustainability goals.
| Material | Main Mechanism | Pros | Cons | Refresh Guide |
|---|---|---|---|---|
| Used Coffee Grounds | Carbon-based adsorption + mild aroma masking | Free after brewing; sustainable; compostable | Needs drying; finite capacity; mild coffee note | 5–7 days (3–4 for strong odours) |
| Baking Soda | Chemical neutralisation of acids | Cheap; odourless; widely available | Less effective on sulphuric/fishy VOCs; easily saturated if closed | 1–3 months (stir weekly; keep open) |
| Activated Charcoal | High-surface-area carbon adsorption | Very effective; compact; minimal upkeep | Cost; single-use cartridges; not always compostable | 1–2 months (per product guidance) |
Quick verdicts:
- For everyday fridges and zero-waste goals: coffee grounds win on sustainability and cost.
- For silent, odourless performance: baking soda is tidy but may lag on fishy/sulphurous notes.
- For persistent or mixed odours: activated charcoal offers the strongest adsorption, at a price.
Why coffee isn’t always better: if you dislike any hint of coffee aroma, grounds may not be ideal. Also, if you regularly store very pungent foods, charcoal’s higher surface area gives it a performance edge. But for most homes, grounds deliver a credible, circular-economy fix with minimal fuss.
Smart Deployment: Placement, Quantity, and Safety Tips
Getting top-tier results hinges on positioning. Odour molecules concentrate where air moves and moisture lingers. Place two small dishes—one near the rear vent (higher airflow), another in the produce or cheese area (common culprits). Space them away from spills to keep grounds dry. Dry grounds are safer and far more effective than damp ones.
- Quantity: 2–4 tablespoons per dish; more isn’t always better because depth reduces exposed surface.
- Containers: wide, shallow ramekins; or breathable sachets to prevent spills in shared flats.
- Hygiene: discard any grounds that contact meat juices or visible moisture.
- Allergy note: rare, but avoid if anyone is extremely sensitive to coffee aromas.
- Energy tip: don’t block rear vents with containers; airflow matters for both cooling and odour control.
If odours persist after a week, troubleshoot the source: wipe seals, clear drip trays, and check crisper vents. Grounds tackle volatile compounds, not hygiene issues. Combine with a monthly bicarbonate-of-soda wipe-down to remove residues that feed future smells. For rental flats or student kitchens, sachets are especially handy—tie one to a shelf rail to keep it stable during rummage-heavy weekends.
In a world of disposable gadgets, coffee grounds stand out as a frugal, circular deodoriser that genuinely works with the physics of adsorption. They’re easy to set up, safe to compost, and surprisingly effective against everyday fridge funk. Try a two-dish rotation for a week and note the difference before opening your wallet for pricier solutions. The best part: you’re upgrading your fridge with something you were about to bin. Will you test grounds alone, pair them with baking soda, or go all-in with a charcoal backup—and which combination suits the rhythm of your kitchen best?
Did you like it?4.5/5 (25)