In a nutshell
- 🍋 Chemistry: citric acid lifts mineral films and mild oxidation while salt acts as a micro-abrasive; results vary by finish (poly blocks penetration, oiled surfaces respond more readily).
- 🧽 Method: Sprinkle salt, rub gently with cut lemon along the grain, brief dwell, then wipe, neutralise with a mild baking soda solution, dry, and recondition with mineral oil or beeswax—don’t soak the wood.
- 📊 Effectiveness: Works best on light water rings and grease haze, offers moderate improvement for iron–tannin marks, and is limited on deep dye/ink stains.
- ⚠️ Pros vs. Cons: Pros—non-toxic, low-cost, quick; Cons—possible etching, grain raise, and over-lightening; avoid on antiques, degraded finishes, or deep chemical stains.
- 🧴 Aftercare: Always neutralise residual acid, condition with hardwax oil, beeswax, or mineral oil, use coasters and pads, schedule light maintenance, and remember—less is more.
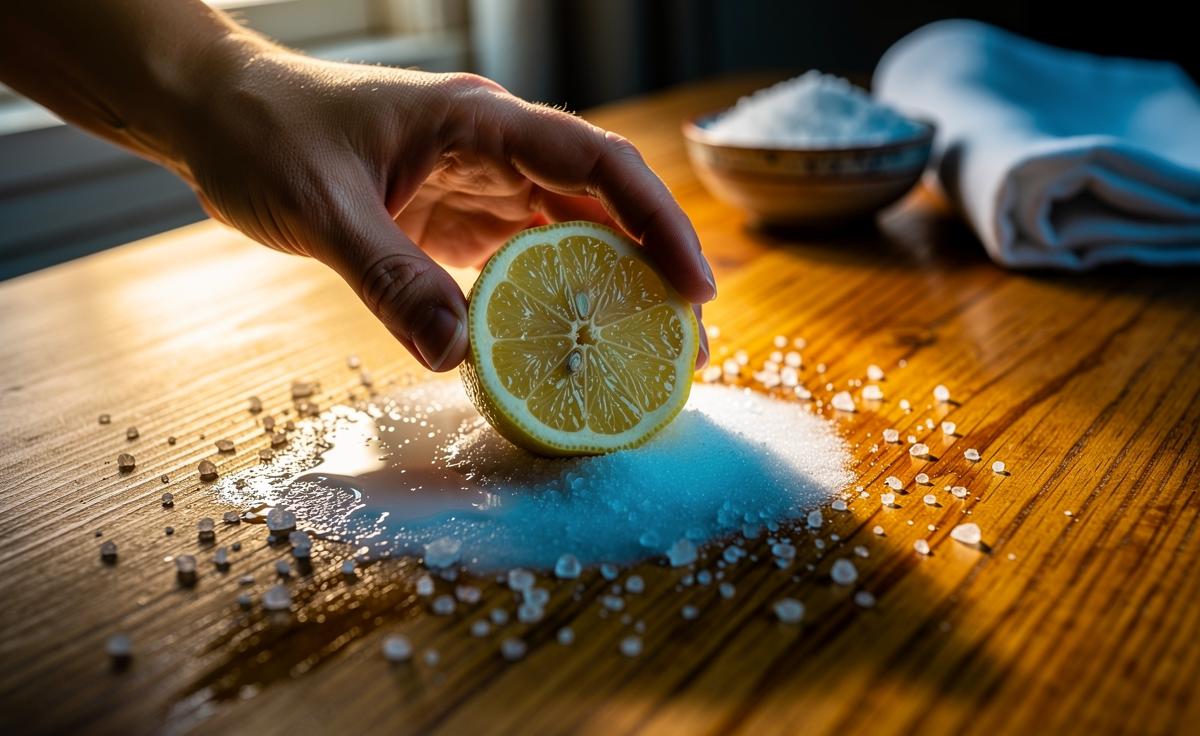
Household wisdom sometimes hides in plain sight, and few tricks are as satisfyingly simple as reviving tired timber with a cut lemon and a sprinkle of salt. This gentle pairing can lift water rings, kitchen splashes, and the greyish haze that makes once-glossy grain look flat. In a world of branded polishes and mystery aerosols, the chemistry here is honest: citric acid and a mild abrasive working together to dislodge stains and brighten the surface. Always test on a discreet spot first to check colour stability and finish compatibility. Used with care, this old-school method restores warmth to boards, butcher’s blocks, and side tables—no harsh solvents, no lingering fumes, just a fresh, clean glow.
Why Acidity Lifts Stains From Wood
At the heart of the lemon-and-salt trick is citric acid, a weak organic acid that gently dissolves mineral deposits, disrupts light oxidisation, and breaks down certain stain compounds. Many “dullness” issues on wood aren’t deep damage; they’re residues—soap scum, limescale from a damp cloth, or oxidised oils—sitting atop or just within a worn finish. Citric acid nibbles away at these films, while salt provides a micro-abrasive effect to lift softened grime without gouging. On woods rich in tannins—oak, walnut—the acid can also reduce the appearance of iron-related black marks caused by wet metal contacting the surface.
Crucially, surface chemistry depends on the finish. A fully sealed polyurethane may block penetration, meaning you’re cleaning residue on the finish rather than the wood itself. An oiled or waxed surface will accept the treatment more readily, but can also be more prone to grain raising if over-wetted. The aim is contact, not saturation. In practice, you’re creating a brief, controlled, low-pH environment to loosen stains, then neutralising and reconditioning so the timber regains its depth, chatoyance, and healthy lustre.
- Citric acid: chelates minerals, disrupts mild oxidation.
- Salt: non-scratch scrubber when used lightly with the grain.
- Finish matters: sealed vs. oiled surfaces respond differently.
Step-by-Step: The Lemon and Salt Method
Begin with a clean, dust-free surface. Halve a fresh lemon and sprinkle fine or medium-grain salt over the stained area. Working with the cut side of the lemon, apply gentle pressure and move in the direction of the grain. You’re not polishing silver; slow, even passes do the heavy lifting. For lighter stains, two to three passes suffice; for stubborn rings, allow the juice to dwell for one to three minutes before a final pass. Do not soak the wood—use minimal juice and stop at the first sign of lightening beyond the stain. Wipe immediately with a slightly damp cloth, then a dry one.
Next, neutralise residual acidity. Mix a weak baking soda solution (about 1/2 teaspoon in a cup of water) and lightly wipe the area, then dry thoroughly. After an hour, condition the surface: a dab of mineral oil, beeswax polish, or a compatible furniture oil restores sheen and protects the refreshed grain. In our newsroom trials on scrap oak and beech, this routine brightened greyed patches and subdued tea-ring ghosts without streaking. If the finish clouds or turns tacky, stop; you may be dealing with a degraded lacquer that needs refinishing.
| Stain Type | Visual Clue | Effectiveness | Typical Dwell Time | Notes |
|---|---|---|---|---|
| Water ring (light) | Pale halo | High | 30–90 sec | Often trapped moisture in finish; gentle passes only |
| Grease haze | Dull, smeary patch | High | 60–120 sec | Salt helps break the film; wipe and re-oil after |
| Iron-tannin mark | Grey/black spot | Moderate | 2–4 min (check often) | May need repeat passes; avoid over-lightening |
| Dye/ink | Vivid colour stain | Low–Moderate | 1–3 min | Might require peroxide or oxalic acid; test carefully |
Pros vs. Cons and When to Avoid It
The lemon-and-salt method has compelling upsides. It’s low-cost, non-toxic, and relies on pantry staples rather than specialist chemicals. It excels at freshening tired surfaces, lifting light rings, and returning a tactile clarity to worn oils or waxes. For renters and DIYers wary of sanding, it’s a reversible, low-risk first resort. Yet there are trade-offs. Acid can etch compromised finishes, and repeated treatments may slightly lighten sensitive species like cherry. Over-wetting raises grain and can leave a fuzzy feel, demanding extra burnishing or oiling. And on high-build lacquers or modern poly, the lemon may only clean residue without touching the underlying problem.
Avoid or proceed cautiously in three scenarios. First, museum-grade antiques where patina is value: consult a restorer before any chemical contact. Second, surfaces with unknown finishes that turn gummy under moisture—this suggests solvent damage or degraded shellac. Third, deep chemical stains (e.g., dye spills) that sit below the finish; you may need oxalic acid or sanding and refinishing instead. As a rule of thumb, if a test patch shows whitening, tackiness, or no improvement after two gentle passes, stop and reassess. Sometimes, the best fix is admitting the job’s bigger than a citrus remedy.
- Pros: Non-toxic, cheap, quick, great for light rings and haze.
- Cons: Risk of over-lightening, grain raise, limited on sealed finishes.
- Avoid: Valuable antiques, degraded finishes, deep dye stains.
Aftercare, Protection, and Long-Term Maintenance
Once the stain lifts, aftercare cements your gains. Let the timber dry fully, then condition with a compatible product: hardwax oil for worktops, beeswax for traditional furniture, or a light mineral oil on butcher’s blocks. Buff with a soft cloth to even out sheen. Always neutralise the acid and remove residue before applying any finish. A London reader’s case study: a mid-century beech sideboard, dulled by plant-pot rings, responded beautifully to a single lemon pass, followed by beeswax; the light scattered bloom gave way to a mellow, even glow that matched its original character without a full refinish.
Protection is pragmatic. Use coasters, felt pads under décor, and avoid parking wet mugs on bare timber. For kitchen boards, adopt a monthly oiling routine; for living-room tables, a quarterly wax keeps oxidation at bay. If sunlight fades tone, rotate objects to prevent “ghost” outlines. Keep a note: date of treatment, product used, and result. These micro “field notes” build a personal maintenance playbook so you can reproduce success. And remember, less is more—gentle, infrequent touch-ups beat aggressive scrubbing every time.
Reviving dull wood with lemon and salt is a study in restraint: precise chemistry, light abrasion, and thoughtful aftercare deliver results that look—and feel—honest. When used judiciously, it can postpone sanding, save a finish, and restore the soft glow that makes timber irresistible to the touch. If your table could use a reset, why not try a cautious test patch this weekend and see what lifts—then tell me: which stain surprised you most, and what finish left the best final lustre?
Did you like it?4.5/5 (21)